How to Make DDP Files for Free in FIVE Easy Steps
Whether you are a musician who DIY’ed your newest record, or a mastering engineer who has to deliver files for CD printing, you might need to make DDP files for the CD manufacturer. Most of the major DAWs don’t come with the feature to create DDP files, and the most popular DDP makers can cost from almost $100 to over $200. They come with extensive capabilities, yes, but most of the time people are just looking for a simple tool. Plus, it would make no sense for a musician to spend that much money on DDP makers when there is a “free” alternative—REAPER*.
In this article, I will not only teach you how to make DDP files in five easy-to-follow steps, but also dive into some of the more technical, nerdy stuff about CDs. I’ve also created a DDP REAPER template to make things even easier for you.
Watch the YouTube video if you don’t want all the technical stuff and just want to learn how to make DDP files step by step.
If you haven’t already, download REAPER and install it. REAPER is only about 20MB, so it won’t cluster up your computer even if you only plan to use it to make DDP files.
*REAPER’s trial is fully functional and doesn’t expire, but you should absolutely purchase a license if you are using it professionally.
Step 1: Setting up REAPER
Open a new project in REAPER, go to File > Project settings…
Under the Project Settings tab, check “Project sample rate” and set it to 44100 Hz

3. Under the Video tab, set “Frame rate” to 75. Hit OK.
4. Right click on the Ruler in the main window, and select Hours:Minutes:Seconds:Frames
5. At the menu bar at the top, go to Actions > Show action list…
6. Type “grid settings” in the filter, and double click “Options: Show snap/grid settings” to run the action
7. In the Snap/Grid Settings window that just popped up, check “Show grid, line spacing,” and set it to “Frames.” Then, close the window.
Now, if you zoom into the project, you will see on the ruler that the project is divided by seconds, and each second has 75 segments.
The reason we are doing this is that the data on a CD are stored in sectors of 2352 bytes each, read at 75 sectors (aka frames) per second, which means that there are 75 CD frames per second. With these grid settings, it will be easy to check for errors and make adjustments to the audio files.
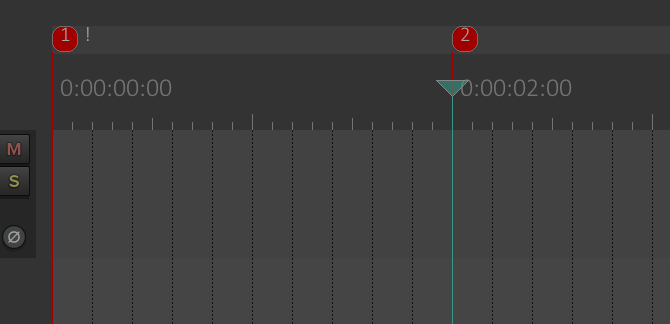
Next, place the edit cursor at the very beginning of the project by left clicking on the ruler, and in the menu bar, go to Insert > Marker (prompt for name). Enter the exclamation mark (!), and hit OK.
Similarly, add another marker at 2 seconds, but leave the marker name blank. It is required to leave 2 seconds of silence before the first track for the DDP files; this is known as the “pre-gap,” and it will not actually result 2 seconds of silence in the CD.
The exclamation mark is called the INDEX0 (that’s a zero), and it’s required for the CD to start at that.
At this point, you should have two markers, one at the very beginning, named !, and one without a name at 2 seconds.
Step 2: Importing the Master Wave Files
In Finder or File Explorer, select all the Wave files that are to be printed to CDs, drag them into REAPER, and drop them at the 2 seconds mark. When REAPER asks if you want to insert multiple media on separate tracks or sequentially on the a single track, choose “Single Track.”
Now, you should have all your master files lined up one after another on the same track in REAPER. Make sure the files are in the correct playback order; if not, it’s important that you reorder them correctly before you proceed.
Check that your record is no longer than 75 minutes. You can check that by moving the edit cursor to the end of the last track, and look at the time on the ruler.
Step 3: Adding Markers
Add a marker at the start of each track, and at the end of the very last track.
In total, you should have one marker at the very beginning of the project, one marker at the very end of the project, and one marker for each track on the record. The total number of markers should be equal to 2 + # of songs.
The marker at the start of a track is actually where the song begins when people are skipping among the songs on a CD player, so it’s important that you place the markers properly.
You also need to check that there is no audio in the first 12 CD frames of each track. You can check that by highlighting 12 frames of a track, starting at the marker (which is also the beginning of the track):
The “Length” in the tooltip will show how many CD frames you have selected. This will only work if you did step 1 correctly.
The reason for this is to accommodate slower CD players. It probably doesn’t matter much anymore, since less and less people are using CD players, but if you are printing CDs, might as well do it properly, right?
Step 4: Adding Track and Album Metadata
Let’s write the track metadata first.
Double click the marker for track 1, which is the second marker, and type # into the “Name” field of the marker. Then, type the track title. The # represents INDEX1, which marks the start of a track.
After typing in the track title, put the vertical line symbol “|” . The vertical line is used to separate one metadata property from another. Do NOT put a space before or after it. The vertical line is usually located at the key right above the Return key. You can type it by pressing Shift + \. If you can’t find it, just copy it from here.
After the vertical line, type “PERFORMER=” and then type the artist name.
There are several metadata properties that you can put for each track, which are TITLE, ISRC, PERFORMER, SONGWRITER, COMPOSER, ARRANGER, and MESSAGE.
You don’t have to use all of them, but you should have at least the title, the performer and the ISRC.
Here’s an example of track metadata:
#Revolt!|PERFORMER=Till I Conquer|ISRC=1234567890|SONGWRITER=Phillip Stewart
Following the same format, write the metadata in the marker of each track.
Next, let’s enter the album metadata
The last marker is where you enter the album metadata, so double click that to edit it.
The formatting for the album metadata is the same as the track metadata, with only one exception: instead of #, put the @ symbol, and then type the album title. The @ symbol represents album metadata.
The available metadata properties you can use for album are:
TITLE
UPC or EAN
PERFORMER
SONGWRITER
COMPOSER
ARRANGER
MESSAGE
IDENTIFICATION
GENRE
LANGUAGE
Like track metadata, you can omit “TITLE” and put the album title directly after “@.”
For album metadata, you should have, at the minimum, TITLE, PERFORMER and UPC or EAN.
Here’s an example of album metadata:
@Album Title|PERFORMER=Till I Conquer|UPC=1234567890|GENRE=Alternative Rock|LANGUAGE=English
Note that while you can enter any custom genre name for GENRE, for LANGUAGE, you are limited to the following languages:
- Albanian - Amharic - Arabic - Armenian - Assamese - Azerbaijani - Bambora - Basque - Bengali - Bielorussian - Breton - Bulgarian - Burmese - Catalan - Chinese - Churash - Croatian - Czech - Danish - Dari - Dutch - English - Esperanto - Estonian - Faroese - Finnish - Flemish - French - Frisian - Fulani - Gaelic - Galician - Georgian - German - Greek - Gujurati - Gurani - Hausa - Hebrew - Hindi - Hungarian - Icelandic - Indonesian - Irish - Italian - Japanese - Kannada - Kazakh - Khmer - Korean - Laotian - Lappish - Latin - Latvian - Lithuanian - Luxembourgian - Macedonian - Malagasay - Malaysian - Maltese - Marathi - Moldavian - Ndebele - Nepali - Norwegian - Occitan - Oriya - Papamiento - Persian - Polish - Portugese - Punjabi - Pushtu - Quechua - Romanian - Romansh - Russian - Ruthenian - Serbian - Serbo-croat - Shona - Sinhalese - Slovak - Slovenian - Somali - Spanish - SrananTongo - Swahili - Swedish - Tadzhik - Tamil - Tatar - Telugu - Thai - Turkish - Ukrainian - Urdu - Uzbek - Vietnamese - Wallon - Welsh - Zulu
Step 5: Exporting the DDP Files
Set the time selection to start at the beginning of the project and end at the last marker. You can do so by dragging on the ruler.
In the menu bar, go to File > Render…
In the Render To File window, set Source to “Master mix” and Bounds to “Time selection.”
Set Output format to “DDP.”
For the directory, you want to choose a dedicated folder because DDP files are six files, and they need to be together when you delivered them to your CD manufacturer.
Filename should be exactly “image,” sample rate should be 44100, and Channels should be Stereo.
Finally, hit Render 1 file…
After rendering, go to the folder where you rendered the files. You will see six files—these are the DDP files. Zip them and send them as one compressed file to your CD manufacturer.
That’s it! Now you know how to create DDP files without spending a penny. If you find this helpful, consider subscribing to get notified when I publish a new post!
If you have any questions, feel free to leave a comment—I will be checking every day.
Visit my portfolio if you are interested in my premium mixing and mastering services!
Further reading:
https://www.travsonic.com/red-book-cd-format/
https://www.sciencedirect.com/book/9780240811321/from-demo-to-delivery